Port mirroring is the most effective way of monitoring the flow of traffic across a switch. Port mirroring is one of the a basic requirement for many network monitoring and network security tools such as IDS Sensors. Port mirroring also helps a lot in trouble-shooting network related issues.
Port Mirroring is also called as (SPAN Switched Port Analyzer) or Port Monitoring.
Port Mirroring is one of the basic difference between the working of HUB and Switches.
HUB: Port mirroring is a default and fundamental feature on HUB because when a packet is received on one port of hub designated for only a single host it sends a copy of it to all the ports except to the port from where the packet originated.
Switches: While in case of a switch it only sends the packet to the designated host by reading it's MAC table and sending it to the Destination port only.
Only Multicast and Broadcast traffic are sent on more than one ports of the switch.
I have made an animation to help understand the concept of port mirroring better.
First let's see packets traveling on switch is without any port mirroring.
Data packets sent by C to A is visible and received only to A, D cannot see or receive it.

As you can see, data packets sent by C to A is also visible and received by D.
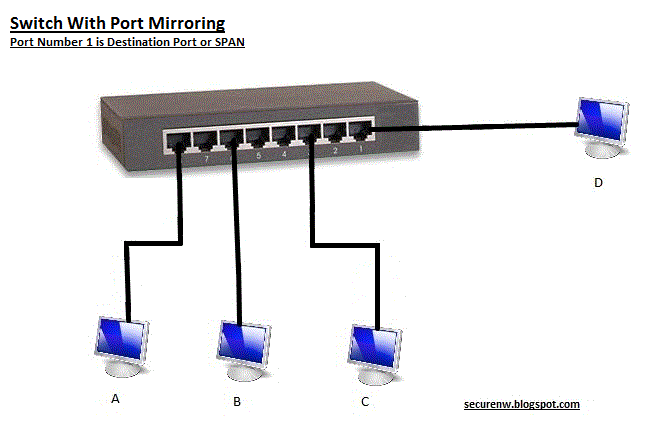
Here the source ports are from 2-8 and destination or Span port is Port No 1 which has D connected to it. D can see all the traffic traveling on the switch.
Port Mirroring on A Cisco 2960 Switch.
Step 1. Login into the switch and go to config mode
Switch#conf t
Step. 2 Now you will need to define a monitor session number it can be anything between 1 to 66. Second thing you need to do is select the ports which you want to monitor or mirror the traffic. These ports are called as source port and it can be a single port, multiple ports or Vlans. Source ports cannot include destination port and you cannot monitor both ports and Vlans in the same monitor session.
Enter a monitor session no and source interface as shown below we have monitor session number as 2 and source interfaces are Fast Ethernet ports 1 to 24.
Switch#monitor session 2 source interface Fa0/1 - 24
If you want to monitor multiple ports not in sequence you can enter the port numbers separated by comma. as shown below. The source ports can be in different Vlans
Switch#monitor session 2 source interface Fa 0/3, 0/5, 0/7
Step 3. Now we need to define the Destination port also called as SPAN port, This is where a traffic analyzer or sniffer can be connected and will see the traffic of all the monitored ports.
The destination port needs to be a physical port and cannot be a secure port. It cannot be a source port. One destination or span port can be a member of only one monitor session at a time. One more thing to note is that destination port cannot be a Vlan.
As shown in below example the monitor session no 2 is same as we used in defining the source port. The Destination port is a Gigabyte 0/1 port of the same switch you can have multiple destination port as well, separated by comma or a range separated by hyphen.
Switch#monitor session 2 destination interface Gi0/1 encapsulation replicate
You also have the following options while specifying the destination ports:
Encapsulation replicate option makes the destination interface replicate the source interface encapsulation method, we have used this in above example.
Encapsulation dot1q option implements the IEEE 802.1Q encapsulation method on the destination interface.
Now exit the config mode by typing end.
Switch#end
Don't forget to write to memory to save your configuration.
Now you can check the status of your monitor session by entering following command along with the session number you want to check:
Switch# show monitor session 2
It should return the a similar output, giving all the information about the particular monitor session.

Verifying Traffic on a Span Port.
You can connect a packet analyzer, sniffer or IDS to the Span port and you will see the traffic on the Span port which in our case is Gi0/1.
A simpler way to tell the if the traffic is coming on Span port or not will be to do a show interface on the Span port repeatedly and see if the Traffic is increasing or not. Remember to check if the increase in traffic is significant enough or it may be a case that you are seeing a broadcast traffic and not the mirrored traffic.
good information,thank you
ReplyDeletegood information,thank you
ReplyDeletethats really great,how to place ids next to firewall
ReplyDelete