Wednesday, February 17, 2010

How to Disable Google Buzz and Turn it Off Completely.

For all those who tried Google Buzz as it launched and burned their finger doing so and now are looking forward to disable Buzz here is how to do it.

Turning Off Buzz is far more difficult than you may think infact it's a nightmare. First it's really hard to find the Turn Off buzz link which is located at the last place the user will look for which is at the very bottom of the page.
Update: Google has now given an option to Disable the Buzz in "Edit Profile" section.

Now that you have found out the link to disable Buzz don't hurry in doing so, as this will mean that your jabbering will still be publicly available and people will still be following you.Go to the Buzz section in your Gmail and delete all the comments and postings you have made.

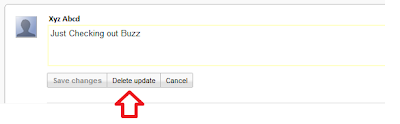
Update: The "Delete profile and disable Google Buzz completely" option in Edit Profile has been added and will also delete all your post now though I am not sure about the comments.

Remember even after doing so your comments and posts will still be available in the inbox of persons who were following you. And there is nothing you can do about this. Now here's when you realize that the saying that "Quarrels end, but words once spoken never die" is so true (don't know who said it).

Now go to the Buzz section it will show you all the persons that are following you and vice versa. Now you will have to go to each and individual user click on options and select Block User , this will not send them any notification or message but will silently block them from your postings. If you have a huge fan following you have one of a hell task ahead to block them all as there is no simple option to block them all.

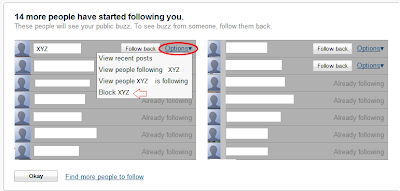
Update: Until this morning there was no option in Buzz to block those followers who didn't had any public profile. But now Google had introduced that option finally, hope Google addresses other concerns also quickly.

After you are done with all this you can go and disable Google Buzz by clicking on Turn Off Buzz from the bottom of the page.

Update: Google has now given an option to Disable the Buzz in "Edit Profile" section.

Lets hope that Google will introduce the basic privacy features in Buzz and then I think some of the people who have turned off Google Buzz may turn it on once again though I am not very sure of the later. Share with me what do you think about Google Buzz and do you think it can take place of twitter.

Update: Google has made many settings appear more prominently and has introduced some privacy feature, still long way to go Google.

Google Buzz: Security and Privacy Concerns

There has been a lot of buzz around "Google Buzz" lately. One fine day everyone got this pop-up in their Gmail asking if they would like to enable Google Buzz, now you thought lets be a sport and said yes.There you go, you started following all the persons in your contact list some of whom you don't even remember and may have sent an email or two.

Similarly others also started to follow you, other like the ones you may have seriously messed with and now they have the contact details of all the girls you are following :-P.

On a more serious note this opens up a lot of opportunities for spammers as they can become your follower and then go on spamming your Google Buzz with links to all sort of weird products and services before you can even find out how to block them.

Now I have been a fan of Google especially for their concern and care about user's privacy. They could have done much better than this, at least they could have given an option for the users to choose if they want to allow others to follow them, instead of automatically making them follow you. And you have to go and block each and every user individually to stop them follow you. there is no block all followers options.

Also if you have a follower who doesn't have a public profile there is no way of blocking him as of now, it seems that Google is going to add this option soon.

Basic privacy options are very essential, especially for an application which is integrated in your email. Because here you get a false sense of security and are not very cautious of who all are seeing your daily jabbers. On Facebook and other social networking site at least you know this is visible to all and you behave accordingly.

One more option that Google could have provided in Buzz was to let you have option of whether you want to send your post as an email or not to all your followers. Because if you want to delete a post just after you publish it before anybody to saw it, it's not possible because the post has already been sent to all your follower's Inbox.

The last but the greatest nuisance is that there is no simple way of disabling the Buzz. I had to dig around for quite a sometime after which I was able to disable it. I don't think a general user will be able to do that and may end up having Google Buzz even if he doesn't want it. And again a simple disabling by clicking on Turn Off Buzz link may not be the best way of doing it, as a lot of what you said still remains for public to be seen. And your followers are still following you.
Read my Post on "How to Disable Google Buzz completely and safely".

Google is now trying to patch up the security concerns and add privacy features in Google Buzz, how much and when only time will tell. But one thing is for sure Google has lost trust of many users and they will be shy next time to try out any newly launched Google products. Some may not enable Google Buzz again even after the concerns have been addressed. As they saying goes "Once burned twice shy"

Let me know about your Google Buzz experience and features you think should have been there.

Friday, August 28, 2009

NTFS Partition Showing Raw / Inaccessible - Solved

Recently when manually removing some spywares from my system I deleted some files from my root directory. After deleting those files I rebooted my machine and tried to access my drives Windows started to gave me error:
Disk in drive H is not formatted. Do you want to format it ?


I tried all other partition and all were giving the same error. Then I checked the properties of the drives and it showed me that the partition was RAW.


Now all these partition had data on it and the worst part was that I didn't had backup.
I noticed that I was able to access only one partition which was the root partition, root partition being the FAT32 partition.


I went to Computer Management and Opened the Disk Management utility, all my NTFS Partitions were showing as healthy but had no Filesytem Type on them.

When I tried to run the The Disk Defragmenter, it game an error that

Disk Defragmentor cannot run on this volume type.

Now I had one more Operating System installed on my system i.e Windows 7.
I booted my machine using Windows 7, and all the partition were accessible with all my data intact and safe.

If we summarize the situation it was :
1. My NTFS partition were not accessible but my FAT32 partition was accessible when using Windows XP.
2. Both FAT32 and NTFS partition were accessible when using Windows 7.


So I concluded that there was some file or driver missing in Windows XP which is important in reading and accessing NTFS partition. This file or driver was present in Windows 7 therefore it could read my NTFS partition in Windows 7.

I searched for files with NTFS in the name in my friends computer having Windows XP we found that following two files were present in Windows folder
\WINDOWS\system32\drivers\ntfs.sys
\WINDOWS\system32\dllcache\ntfs.sys

Then I checked my system and found that these files were missing. I found that ntfs.sys files is also present in Windows\ServicePackfiles\i386 folder.

I copied ntfs.sys file to both these location
\WINDOWS\system32\drivers
\WINDOWS\system32\dllcache

Restarted my machine, tried to access the NTFS partition and all my NTFS partition were accessible with all my data safe and sound :-)

So if any of you guys have similar issue try copying new ntfs.sys file in both the location. May the ntfs.sys file is missing or corrupt

You can also copy ntfs.sys file from your Windows XP installation Disk by following the below Steps:

1. Boot your machine using Bootable Windows XP CD

2. At the "Welcome to Setup" screen, Select R to repair Windows XP installation using Recovery Console.

3. Enter the number of the Windows installation that you want to access this would be 1 or 2 depending upon the number of OS you have installed.

4. If you have administrator password then enter it or just press ENTER if blank password is set. You will get DOS like command prompt

5. Enter the following command and press Enter
copy CD Drive Letter:\i386\ntfs.sys drive:\windows\system32\drivers
Replace CD Drive Letter with the drive letter of your optical drive.

6. Now you can remove the Windows XP CD from your optical drive and type quit to exit from recovery console. Now restart your machine.

7. Try now to access the NTFS drives it should be accessible.

I have also noticed that if the ntfs.sys file exists in on of the below location, even if you delete one of them it will copy it again from the other location.
\WINDOWS\system32\drivers
\WINDOWS\system32\dllcache


Remember folks, if a partition is inaccessible there might be several reason for it. The above solution may or may not help. Numerous possibilities and condition needs to be considered when you lose or have a inaccessible partition. You may need to run Data recovery tools to fix your error and recover your partition. I will discuss about some great Data Recovery Software available for both FAT and NTFS file system in my coming post.

Monday, August 10, 2009

Switch Port Mirroring on Cisco IOS

Port Mirroring is sending a copy of all the packets received on one or more ports of a switch to another designated port of the switch. It's like having mirror images of packets being received on source port/s of a switch without disturbing the original flow of traffic.

Port mirroring is the most effective way of monitoring the flow of traffic across a switch. Port mirroring is one of the a basic requirement for many network monitoring and network security tools such as IDS Sensors. Port mirroring also helps a lot in trouble-shooting network related issues.

Port Mirroring is also called as (SPAN Switched Port Analyzer) or Port Monitoring.

Port Mirroring is one of the basic difference between the working of HUB and Switches
.

HUB:
Port mirroring is a default and fundamental feature on HUB because when a packet is received on one port of hub designated for only a single host it sends a copy of it to all the ports except to the port from where the packet originated.

Switches: While in case of a switch it only sends the packet to the designated host by reading it's MAC table and sending it to the Destination port only.
Only Multicast and Broadcast traffic are sent on more than one ports of the switch.


I have made an animation to help understand the concept of port mirroring better.

First let's see packets traveling on switch is without any port mirroring.
Data packets sent by C to A is visible and received only to A, D cannot see or receive it.


Switch Without Port Mirroring


Now see the difference after enabling port mirroring. on the same switch.
As you can see, data packets sent by C to A is also visible and received by D.


Switch With Port Mirroring

Here the source ports are from 2-8 and destination or Span port is Port No 1 which has D connected to it. D can see all the traffic traveling on the switch.


Port Mirroring on A Cisco 2960 Switch.

Step 1. Login into the switch and go to config mode

Switch#conf t


Step. 2 Now you will need to define a monitor session number it can be anything between 1 to 66. Second thing you need to do is select the ports which you want to monitor or mirror the traffic. These ports are called as source port and it can be a single port, multiple ports or Vlans. Source ports cannot include destination port and you cannot monitor both ports and Vlans in the same monitor session.
Enter a monitor session no and source interface as shown below we have monitor session number as 2 and source interfaces are Fast Ethernet ports 1 to 24.

Switch#
monitor session 2 source interface Fa0/1 - 24


If you want to monitor multiple ports not in sequence you can enter the port numbers separated by comma. as shown below. The source ports can be in different Vlans

Switch#
monitor session 2 source interface Fa 0/3, 0/5, 0/7


Step 3. Now we need to define the Destination port also called as SPAN port, This is where a traffic analyzer or sniffer can be connected and will see the traffic of all the monitored ports.

The destination port needs to be a physical port and cannot be a secure port. It cannot be a source port. One destination or span port can be a member of only one monitor session at a time. One more thing to note is that destination port cannot be a Vlan.

As shown in below example the monitor session no 2 is same as we used in defining the source port. The Destination port is a Gigabyte 0/1 port of the same switch you can have multiple destination port as well, separated by comma or a range separated by hyphen.

Switch#monitor session 2 destination interface Gi0/1 encapsulation replicate

You also have the following options while specifying the destination ports:
Encapsulation replicate option makes the destination interface replicate the source interface encapsulation method, we have used this in above example.
Encapsulation dot1q option implements the IEEE 802.1Q encapsulation method on the destination interface.

Now exit the config mode by typing end.
Switch#end

Don't forget to write to memory to save your configuration.

Now you can check the status of your monitor session by entering following command along with the session number you want to check:

Switch# show monitor session 2

It should return the a similar output, giving all the information about the particular monitor session.

Switch Show Monitor Session


Verifying Traffic on a Span Port.

You can connect a packet analyzer, sniffer or IDS to the Span port and you will see the traffic on the Span port which in our case is Gi0/1.
A simpler way to tell the if the traffic is coming on Span port or not will be to do a show interface on the Span port repeatedly and see if the Traffic is increasing or not. Remember to check if the increase in traffic is significant enough or it may be a case that you are seeing a broadcast traffic and not the mirrored traffic.

Saturday, August 8, 2009

NTP Server Setup on Linux and Client configuration for Cisco Switch Routers, Windows XP / 2k3 and 2000 for Time Synchronization.

Near Accurate Time and most importantly synchronization of Time across all network is critical for accurately tracing and correlating of events and logs across the network. Many a times while troubleshooting or investigating a incident you need to compare logs of lots of devices, but those comparison of logs are only of use if the time across the network is synchronized.
Time synchronization is one of the important aspect in any security setup which is very often overlooked.

NTP ( Network Time Protocol ) is a protocol used for same purpose that is synchronization of time, where we can use a highly accurate reference time source and synchronize it with other clients.One point to note though is NTP provides time in UTC and doesn't have any provision for Time Zone or Day Light Time Saving, these settings must be done on the Client Machines separately.

Stratum
Stratum is another important terminology in context of NTP implementation. The highest level of Time source is at Stratum 0 the next level at Stratum 1 and so on.
Stratum 0 are atomic clocks, radio clocks and other high precision time source. These devices are connected directly with stratum 1 source.
Stratum 1 are time sources directly connected with Stratum 0 devices and act as a server for Stratum 2 clients.

Stratum 2 Computers reference time source from multiple stratum 1 servers and other peer stratum 2 servers and uses algorithm to reject time source from inaccurate stratum 1 servers.
Stratum 3 Computers uses same technique of stratum 1 and also act as a reference clock for many lower stratum computers and devices.

NTP Implementation Hierarchy:You can have one of your devices or computer act as a server for all your devices. The other option is you can have hierarchical implementation in your network. The device at the topmost level of hierarchy will refer time sample from a Stratum 1 or 2 server on the Internet and then act as a server for lower hierarchy devices. The implementation depend upon your particular need. But the most important factor to consider in any NTP implementation is Time Source, it should be highly accurate or else you will end up synchronizing all of your network to wrong time.

Linux NTP Server Configuration:
Now lets see how we can configure our Linux boxes to act as a Time Server for our network. You an use any distro of Linux like Redhat, Fedora, SUSE or any other you like. Most of the Linux distributions will have ntp package installed on it by default. If not then you can search and download a rpm package for NTP.

Remember most of the NTP package rpm will start with ntp and version no. for example
ntp-4.1.2xxx.rpm.

Before we can proceed ahead we need will be to zero in on few accurate reference time sources. You will need to evaluate time source based on your geographical location and accuracy of time required by you. Geographically closer time source means lesser no of hops and thus most probably more accurate time. You can also check with your ISP if they provide any accurate time servers.
Ports required to be opened on the Firewall or Gateway Device:
UDP 123 (NTP)

NTP Server Configuration on Linux Machine:

The configuration of NTP is located in /etc/ntp.conf file.

Now login with a administrative privilege account or do a su.
1. Open the ntp.conf for editing.
root@linux# vi /etc/ntp.conf

2. Enter the time Servers you want to use as your reference Clock. For this example we will take the below given servers, but again the choice of time servers will depend upon the degree of accuracy required in your individual scenario.

server pool.ntp.org
server ntp.research.gov

3. Now you need to restrict the type of access these servers will have on your linux box. You don't want to allow the remote time servers to modify the configuration or query your Linux NTP server.
restrict pool.ntp.org mask 255.255.255.255 nomodify notrap noquery
restrict ntp.research.gov mask 255.255.255.255 nomodify notrap noquery


4. Now you will need to allow which networks are allowed to query time from your Linux Time server.To allow Time query you will remove "noquery" from the end of restrict statement. as shown below.
restrict 172.16.00 mask 255.255.0.0 nomodify notrap

5. Now we will need to ensure that the local loop back address 127.0.0.1 has full access, so will remove all "nomodify", "notrap" and "noquery" from the end of restrict statement as shown below.
restrict 127.0.0.1


6. Save ntp.conf file.

7. Now we will need to make sure that the ntpd service will start when the system is rebooted or started. For this enter the following command.
root@linux# chkconfig ntpd on

8. Stop the NTP service if already running this action is required for updating the time on the time server with the reference clock, if the ntpd daemon is running it will return error.
root@linux# ntpd stop
root@linux# ntpdate -u pool.ntp.org


9. Now start the NTPD daemon for by following command
root@linux# service ntpd start.
Check the status of ntpd service by following command, it should return some process id as shown below.
root@linux# service ntpd status.
ntpd (pid xxxxx) is running...

10 . To check if your synchronization is proper or not
enter the below commands. It will show the status of all the remote time sources you are synced with. In the below example we have only one remote time source.
root@linux# ntpq -p

remote refid st t when poll reach delay offset jitter
====================================================================
*
120-88-47-10.in ntp1.nl.uu.net 2 u 552 1024 377 8.940 -1.223 0.178

If you are properly synchronized with the reference time source the delay and offset of the Internet time server will not be zero and the jitter will be under 100.

Configuring Clients to Synchronize with our NTP Server.

Linux Client (Redhat or any other Flavor) :
For Linux client you will need to open /etc/ntp.conf file and set server as a IP of your Linux Time server and the save the file. for example:
server 172.x.x.xrestrict 172.x.x.x mask 255.255.255.255 nomod
ify notrap noquery
For first time for proper synchronization stop the ntpd daemon if running and do
ntpdate -u
Start the ntpd daemon and check the ntp Status by ntpq -p as we discussed above.

Windows XP / Server 2003:
To Synchronize with Time Server Double Click on the time in the lower right hand side corner.


If the time is not visible in task bar then do the following:

Open Date/Time in Control Panel Click on the "Start" button Move the pointer to "Settings"

Move the pointer to "Control Panel"Click on "Control Panel"

Double-click on "Date/Time"Date and Time Properties

Go to Internet time Tab in this window.

Tick the
Check Box "Automatically Synchronize with an Internet time server"

Enter in Server IP address of your NTP sever, for example 172.x.x.x as shown below.
Click on Apply and then on Update now button.

The Time should now synchronize with the NTP server 172.x.x.x and the message that time has been successfully synchronized should be displayed as shown in the above screen-shot below.


NTP Synchronization Setting on Windows 2000 Server:


NTP Synchronization of Windows 2000 may be tricky for some as there is no Internet Time Tab in Time properties. We will have to do this by command prompt.

a. Open Command Prompt

b. Enter the following command
net time /setsntp:172.x.x.x

c. Then stop the windows time service with the following command
net stop W32Time.

d. Start the windows time service with the following command
net start W32Time

This should look like as shown below:


Synchronize Cisco Switches and Routers:


To Synchronize Cisco Switches and Routers perform the following steps as shown below:

cisco# config t
cisco(config)#clock timezone GMT 0 00
cisco(config)# ntp update-
(config)# ntp server 172.x.x.x
cisco(config)# exit
cisco# wr mem


To check if Switch or Router is synchronized correctly:show ntp status: Should show that clock is synchronized. along with the time reference time source in our case 172.x.x.x.

If you face any problem while implementing NTP Server or Client, let me know and I would be glad to help you.